A Detailed Guide on Hallway Usability Testing

So you’ve got a fantastic idea for improving your product’s interface. The problem is, it’s going to cost time, money, and energy to implement. You think it’s going to be great, but how can you tell for sure?
People have already created a solution for this situation. It’s a hallway usability test, which is also known as guerrilla testing. It will help you determine whether you’re on the right track in the early stages of development.
Below you’ll find an ultimate guide on hallway usability testing based on our own experience.
Here we’ve collected everything we know about picking up respondents, questions that will allow you to get relevant answers, and how to record your data to get the most out of it. We’ll also tell you about some common mistakes that could break your test and how to avoid them.
Come on out! Let’s go, it’s a hallway testing!
You can watch our video on YouTube in case you don’t have time for reading the article. Here it is:
What are Hallway Tests?
A hallway test is a quick usability test of the interface in development.
When you’re launching some product, you always want users to perceive it as your team intended. hallway usability testing was developed precisely for this. What is more, this can identify any obstacles that arise during its use. No research will show you what’s useful in your product better than people who are not in the context of your doing.
Let’s say you’re about to release an update, and you want to determine whether you’ve picked the right approach.
Here’s how you do it using hallway usability testing.
First, your team needs to set up a prototype (or MVP) and share it with a group of users. Next, you will need a procedure for observing how “real people’s” perception of the layout compares with the team’s expectations.
These users may be your colleagues who are not involved in developing the update or even just random passers-by. A typical interview will take from 5 to 15 minutes. That is the hallway Test.
Why was hallway testing called like that? Because you catch people from the hallway and conduct the test with three to five random people. It gives you actionable feedback in a minimal timeframe.
Additionally, hallway testing saves you money. You fix all the main problems before the release so that the hallway usability testing shortens and optimizes the standard development cycle.
By the way, you don’t need to literally “go into the hall” or even conduct a test in person. For instance, many companies do such tests remotely because their users may be spread worldwide — even in the other hemisphere.
When are hallway usability tests suitable, and when are they not?
Hallway tests aren’t a silver bullet solution for everything. For instance, when testing graphic design options, A / B tests or design consultation are more suitable than hallway usability testing.
Instead, hallway usability testings are useful when you need to find some design errors in the interface that prevent users from making a key action. It includes the user interface (UI) of applications and programs and content such as landing pages, emails, and articles with all of their components (images, texts, CTA, etc.).
Be careful about making significant decisions based on hallway usability testing results. It won’t uncover all the problems you actually might have, so it’s always better to conduct additional research to make critical decisions.
Got It! Check Your Email

Hallway Test Examples
Recently we conducted hallway usability testing on one of our main landing pages. As an experiment, we wanted to add a small quiz that helped users understand the tasks that Dashly can help with. After submitting the quiz, we asked users for their email address.
The planned scenario of the testing was like that:
Users complete the quiz → Submit their mail
But things didn’t go quite as planned.
Marketer Ann participated in the hallway test as a future client. After completing the quiz, she said that she likely would not submit her email. “I still haven’t understood anything yet, and they already want something from me,” she said. The same results we’ve got from the real users.
The hallway testing helped us to understand that the quiz didn’t work as it was supposed. Therefore, we needed to change it or even replace it with another mechanic.
We added some changes and ran the second iteration.
This time, the user expected to see how the service works, but instead, we asked them to submit the form with their email address. This kind of mechanism may feel like a “bait and switch” tactic even if not intended. It can be very off-putting for users, making it much less likely that they’ll submit their email address.
Again, temporary defeat. But we learned a valuable lesson — the focus of the quiz needed to change. We decided to highlight our clients’ tasks and then link them to specific service features, providing a solution.
Let’s consider a slightly different example:
Our marketer Polina created an email message that suggests configuring lead generation through pop-ups.
One of the participants in Polina’s hallway test pointed out something wrong with one of the animations. So Polly decided to remove it.
How to set up a Hallway Test
Where to begin
So, you come up with some interface, landing page, or another product.
Before the hallway testing itself, you need to define the set of steps that the user will make before committing the critical action.
Essentially, this is a very simplified version of the customer journey map.
The scenario can be represented as follows:
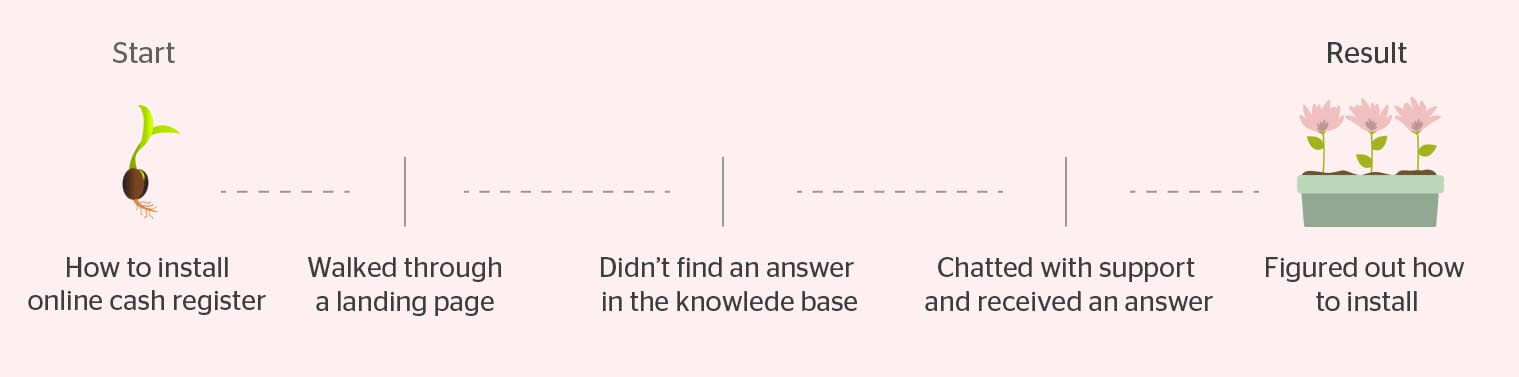
During the hallway testing, this scenario will help you to collect data on how users behave at each stage and analyze this afterward. Your task here is to find and analyze bottlenecks that distract users from taking critical action.
The next step is to create a legend and share it with the user.
Below, you can find a template to help you create yours:

Here’s an example of a hallway test legend:
“Imagine that you own a small online store. You want to accept payments from your users directly on the site. To do this, you need to install an online cash register, but you don’t know how to do that. You visit the support site, and you see this page.”
How to search for respondents
In many cases, you may conduct the hallway testing with your colleagues. When it comes to basic things, your team’s people will easily find problems that real users are likely to encounter.
But there are some instances where using team members may prove counterproductive. One such case is when you need to evaluate the interface from a new user who has never encountered your product.
For example, when you need to update the onboarding process, it is not good to involve team members. They understand this process and have already completed this (maybe even several times), so the experiment won’t be relevant.
Additionally, it would be best to have respondents within specific professional roles and a certain level of experience. And sometimes it isn’t easy to find such a person inside the team.
Here are your options what you can do to find interviewees for the hallway testing:
- ask colleagues, friends, or acquaintances;
- ask passers-by to participate in the test;
- find people among your existing, who fit the selected criteria;
- ask in special chats and groups on social networks;
- use paid services to search for interviewees (Respondent, User Interviews, Usertesting, usabilityHub).
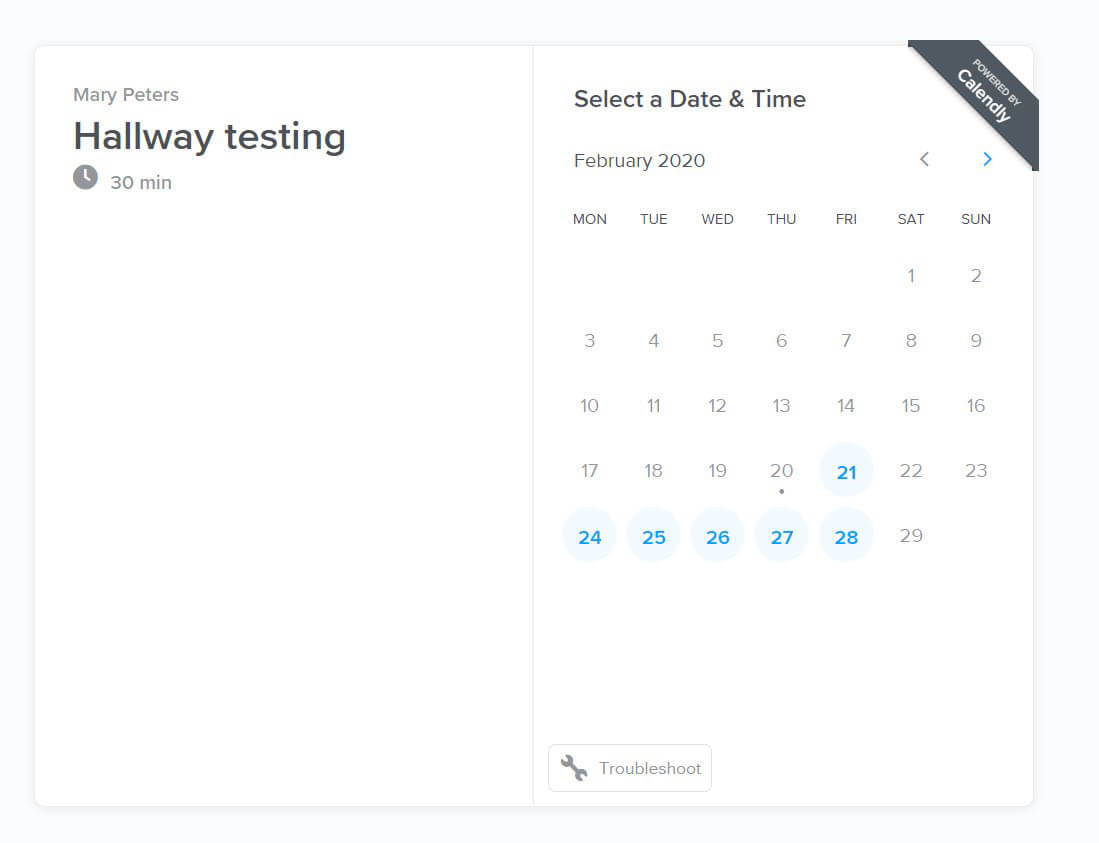
When making an appointment, we faced another problem: it was difficult to agree on a time slot that suits everyone. Here is the solution that helped us many times — Calendly. Using Calendly, respondents can see free time slots and book them. So this takes a few minutes.
How many hallway tests you need
The main aim of hallway usability tests is to detect the problem. So here, the concept of sample saturation applies.
As soon as you realize that a pattern begins to emerge, it’s time to stop. Usually, it’s enough to conduct from 5 to 15 hallway testings.
In practice, this figure consists of several iterations, each of which will feature 3 to 5 respondents. But if several users in the first iteration successfully interact with your product, there is no need for the second one.
Time permitting, you can conduct another interview as your control one. If three out of five interviewees have experienced difficulties, it’s a clear sign that you need another iteration.
How to organize the hallway test
Rule 1: Prepare everything in advance.
Ensure that all the materials you will need are opened, and users don’t need to wait for you.
Rule 2: Record a video.
Why do you need a recording during the hallway testing?
- It will help you to recognize users’ non-verbal behavior (gestures, emotions, and so on). Sometimes it will tell you even more than what the user says. Also, during the test itself, it is challenging to monitor non-verbal signals and concentrate on a conversation independently.
- You may miss some detail if you’re making only manual notes during a hallway testing.
- Reviewing the recording will give you a chance to see things you might have missed during the test.
- You can show the recording to colleagues so that they help you with the interpretation.
Note that you need to film the respondent’s face and the interface you’re testing.
Here is an example when the context is not visible:

And this is an example where the context is visible but the face is not:
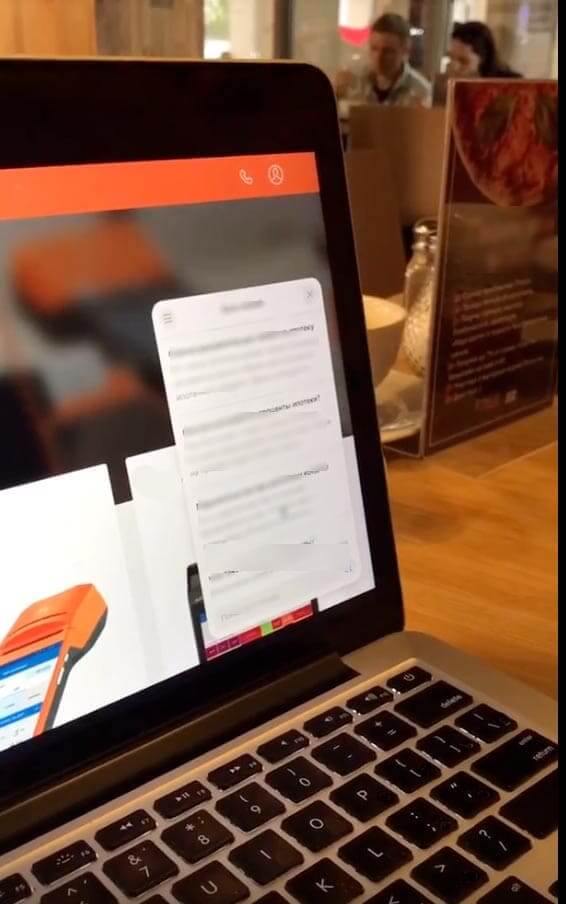
This is the recommended way to do it. Note that both the face and the context are visible:

It is also worth paying attention to how the user controls the screen during hallway testing.
There are two options:
- You show a screen demonstration and control the mouse.
In this case, respondents will have to read out aloud and ask you to scroll further.
It is a good option when you need to learn about each block’s perception, or you technically cannot give users access to the screen. - Respondents control the mouse themselves and scroll through the screen.
This option is more advantageous. You can see how the person moves the mouse, indicating what the user is looking at, and the context becomes more evident. Additionally, you won’t have to ask the user whether to scroll further, which can sometimes be confusing.
As we’ve conducted lots of hallway testing already, we have a small hack from our product team:
It’s a good idea to run hallway tests with a team member, even if it is being done remotely and recorded in Zoom. It makes it possible for one person to focus entirely on the test itself while the second is taking notes.
If the test is full-time, this is the more convenient configuration, which allows one of you to fully concentrate on the conversation while the second person records the test results.
For example, we often conduct hallway usability tests by the product manager and product designer.
How to talk and what questions to ask
At the very beginning, you need to set the context. If there is no context, your respondents will come up with their tasks and begin to speculate about what is wrong with the interface and how to improve it. The context will help a person to understand the goal that they should meet.
To set the context, you need to provide a legend — describe the situation in which the user was when interacting with your product.
Next, start asking three main questions: “What do you see?” “What do you understand?” “What do you want to do?”
You can do it iteratively. For example, show one part of the landing page and ask these questions, then the other — and repeat the same questions again.
“What do you see?”
It is an introductory question. Its purpose is to understand how respondents feel the context and what attracts their attention in the first place.
“What do you understand?”
This question aims at learning how respondents interpret the information, whether they have understood the value proposition in the way it was supposed to be, and whether they have additional questions.
“What do you want to do?”
Other options are “What do you think will happen when you click on this button” or “Where would you click to do X?” These questions clarify the goals of each action and expectations from the interface.
The answers to these questions will help you see what respondents have understood from your landing page, what they saw, and what they didn’t see. This last point is crucial, especially if most of your respondents aren’t noticing the “Buy” button.
Now, let’s look at some of the questions that may arise during a hallway usability test, but you should ask them with great care:
“What would you change on this site/landing page?”
The user may start inventing features that you don’t need. Therefore, you always need to find out which problem the user wants to solve (and understand if this problem needs to be solved at all), and then come up with a feature that will resolve this problem.
“If we remove/add this feature, will you like this page?”
People cannot predict the future, but in response to this question, they’re likely to say ‘Yes’ because it contains your expectations.
Instead of asking this question, it is better to study the path that led the respondent to the negative perception. For example, ask, “Why is it important for you to have this feature?”
It happens that the hallway test turns into an expert interview. A clear statement of the problem, script, legend, and timing will help you avoid this. If this happens anyway, use the same set of critical questions to get the respondent back on track.
Common mistakes in organizing the hallway usability testing
We’re happy to share our own experience with you 😊
- You are not preparing the script. In case there is no scenario for the hallway testing — it is not clear what task users should solve and how they should do it. Also, without a plan, it will not be possible to create a coherent legend.
- You are not explaining the legend to the respondent before the hallway test. If this is not done, then the respondent will not understand what they need to do. As a result, they are likely to start speculating about what is expected of them, making their responses unreliable.
- You are not recording everything that the respondent says and does during the hallway testing. Recording on audio and paper will not work because they do not capture a huge layer of information — non-verbal behavior. Video recording will help to fix it all.
- You are talking too much. Talk only as much as is necessary to explain the product and what you expect of the respondent. If any questions arise, answer them to the point without getting chatty. If you derail the test with the excessive conversation, the hallway test results will be unreliable.
- You are interrupting the respondent or getting upset when they speak. Your role should be that of a facilitator. Give the respondent a clear direction and goal, and if they have doubts, clarify them. The key here is active listening.
Comments can be confusing. Perhaps the user wanted to take another action, but the instructions led them astray. The best strategy is active listening. - You are failing to keep the respondent actively giving feedback. During hallway tests, your respondent should be reading out aloud and voicing their actions so that you can follow their thought process. If a person does not say anything, then you need to prompt them with three questions: “What do you see? What do you understand? What do you want to do?” Avoid situations where the respondent is silently leafing through the content without offering any feedback.
- You are ignoring emotions. Paying attention to the feelings of your respondents will help you effectively manage the attention of other users. If a landing page is delightful, then users are more likely to scroll down and see the subsequent blocks of content. If there is an emotional withdrawal somewhere, then your customers will leave.
- Defending the product instead of listening to the respondent’s criticism. Remember, respondents are here to help you, not hinder you. If you follow these guidelines carefully, you are more likely to receive valuable and insightful feedback. Not all of it might be pleasant, but it would be unwise to dismiss it.
Read also:
👉 Live Chat Best Practices: 20 Hacks to Make Customer Service Better
👉7 Best Live Chat for eCommerce: Boost Conversion on your Website
👉 Top 5 live chat mobile app: find the best fit for your business
👉 Live Chat: How Online Chat Tool Can Help Your Business
👉 20 Best Live Chat Software for your website chat service
👉 Acquisition funnel marketing: Grow customer conversions at each step of user journey
👉 The top 15 inbound marketing tools: harness digital power and elevate your business
👉 10 best website personalization tools to deliver top-notch visitors experience
👉 7 best email capture tools: features and pricing compared for 2024
How to organize the collection of results
Once you’re done with the hallway usability testing, you need to sort out the results in a way that makes them easy to understand and interpret.
In our team, we use tools to synchronize all the research in the group, control the process, share useful materials, and results.
We have a channel in Slack, a board in Favro, a folder on Google.Drive, and special meetings to discuss results and future actions.
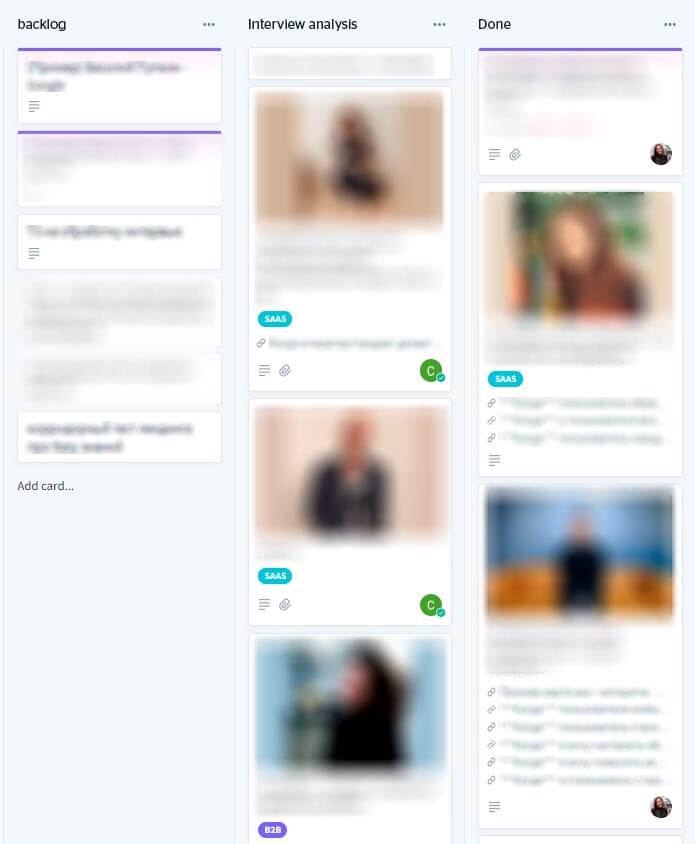
This is what the board looks like in Favro:
Tip: In addition to the video, you should also save the materials themselves in the form you showed them to the respondent (prototype or screen), along with the script, legend, and brief conclusions.
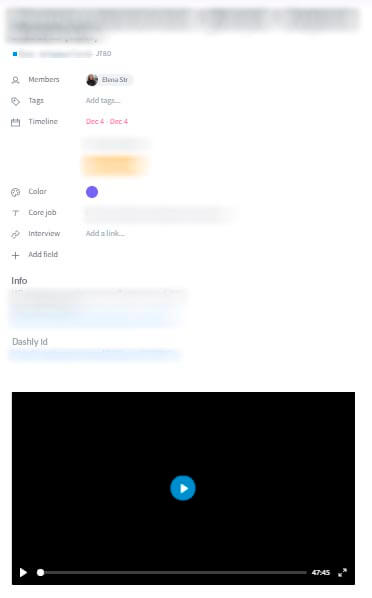
This is what the interview card looks like in Favro:
To store and analyze insights, create a document (Google Doc or Notion) or spreadsheet.
For example, Konstantine from the Dashly product team takes notes on everything the respondent did during the hallway testing. Then he fixes all the difficulties that arose during the problem’s solution and the insights received.
Marketer Valerie came up with an excellent solution for removing all the obstacles that users encountered on the Dashly knowledge base landing page, which we recently launched. She used Miro for data capture and visualization.
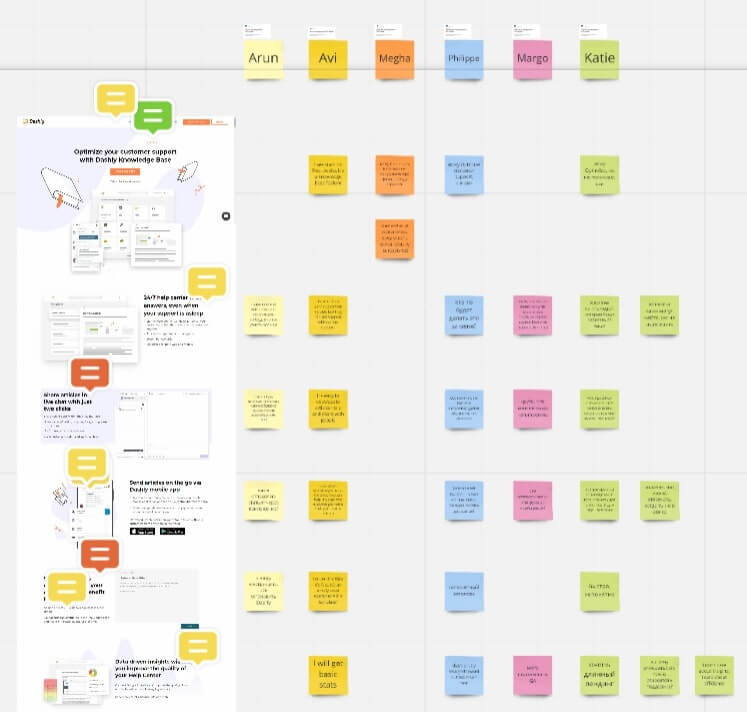
The results of the hallway tests of the Dashly knowledge base landing page:
- Left — The landing page itself and notes with new versions of the text and visual materials
- Right — All significant comments of the respondents
The next important step is to discuss the results of the hallway tests with the team to synchronize.
How to draw conclusions
Remember the scenario that we drafted at the planning stage? That will come in handy as we analyze the results.
We’ve run the hallway testing, and we have a recording of the process. Now it’s time to look through the recording and superimpose the script over the respondent’s obstacles at each stage.
Here’s how it might look, based on the example of Eugene’s hallway usability testing:
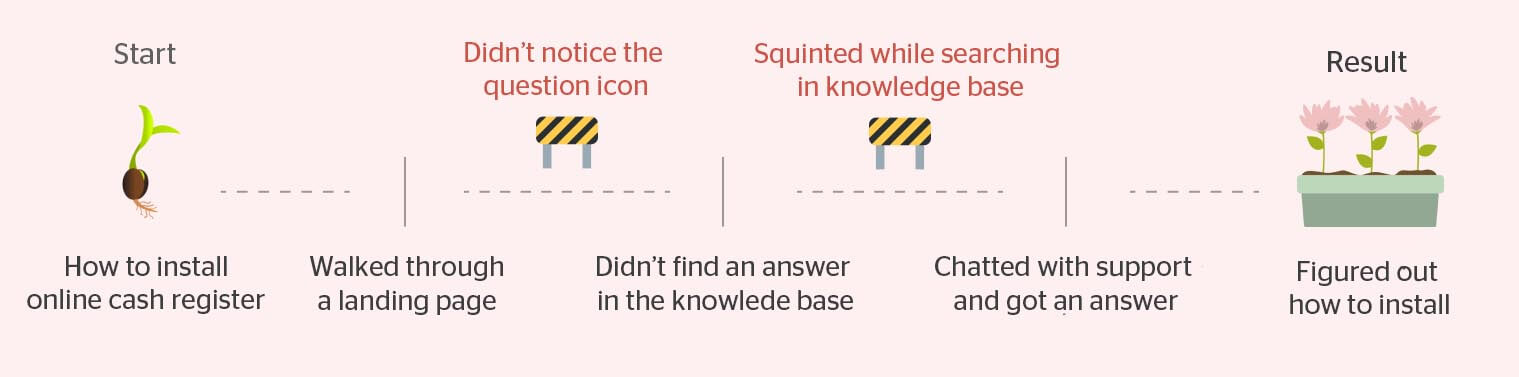
Now, the team can eliminate the obstacles identified in the test, create the next iteration, and then conduct another series of hallway tests to evaluate how significant these changes have been in smoothening out the respondent’s journey through the process.
Mistakes to avoid when analyzing results
- You are giving too much weight to the respondent’s advice. Just because a respondent advises you to add the transition to chat on Facebook, it doesn’t mean you should do it immediately, or do at all. Your primary job in hallway testing is to identify and deal with the problem that a person wants to solve.
- You are only paying attention to what the respondent is saying. When going through the recordings, it is essential to pay attention to the respondent’s emotions to find bottlenecks. If a respondent looks flustered or frowns, they have likely stumbled upon an obstacle that will cause your users to leave the page.
Useful services and applications:
On a final note, here’s a selection of tools we’ve found to be useful when conducting our hallway tests.
Calendly is to synchronize with respondents by time and channels.
Zoom for video calls with the ability to share the screen and record a call.
Getcover is to demonstrate prototypes.
Figma is to create a script or customer journey map.
Miro is to create a script and frame for visualizing the results (and sharing with the team)
Favro is to schedule interviews, store results, and synchronize with the team.
Now you have everything to become the king of the corridors.
The point is small — start to carry them out.
P.S.: You will laugh, but we also corridor this article!
| This article was first published on February 25, 2020. December 1, we’ve updated it. |